
Technical and tactical characteristics of the PMP mine
- Mine type
- anti-personnel pressure-actuated bullet mine
- Body
- steel
- Weight
- 0.145 kg
- Cartridge
- 7.62x25 mm TT
- Length
- 120 mm
- Diameter at the cap nut
- 36 mm
- Sensitivity
- 7-30 kgf
- Time to armed condition
- instantaneous after removal of the safety pin
- Bullet caliber
- 7.62 mm
- Bullet weight
- 5.52 g
- Operating temperature range
- -40 to +50 °C
- Color
- bare metal or gray
- Marking
- PMP - mine code
72-44-74 - manufacturer's plant code - batch number - year of manufacture
Construction and operating principle
The PMP mine consists of a body, barrel, pressure firing mechanism, and pistol cartridge (7.62x25 mm TT).
The mine body (pos. 11) is a metal casing, inside which the firing pin (pos. 12) is secured at the bottom.
The barrel (pos. 8) has no rifling; the bore is smooth. A pistol cartridge (pos. 10) is located in the lower part of the bore. On the outside of the upper part of the barrel there is an annular groove into which the balls of the firing mechanism engage.
The pressure firing mechanism serves to retain the barrel in the cocked position and to actuate the mine. This mechanism consists of a sleeve (pos. 1), coupling (pos. 6), firing spring (pos. 7), and washer (pos. 9) fitted onto the barrel, two balls (pos. 5), and a safety clip (pos. 3) with a ring (pos. 4). Longitudinal slots are cut in the top of the sleeve, into which the bridges of the coupling enter.
The balls located in the holes of the coupling enter the annular groove on the barrel and bear against the sleeve, retaining the barrel in the cocked position. The sleeve is held in the upper position by the compressed firing spring. The sleeve is covered on top by a rubber cap (pos. 2). The safety clip (pos. 3) is installed on the sleeve outside the rubber cap, is retained on it by means of the hinged ring (pos. 4), and prevents the sleeve from moving downward. In the assembled mine, the body and the pressure mechanism (with the barrel and cap) are connected by means of the cap nut (pos. 14) and nut (pos. 13).

The pistol cartridge (pos. 10) is secured in the barrel by a nut.

The mines are supplied with metal pins (1 pcs per 32 mines) and plywood support washers (1200 pcs per 6000 mines).
The metal pin is used to make holes in the ground for mine emplacement.
Plywood support washers (10x10 cm in size) are used to increase the bearing surface of the mine when emplacing it in loose snow and marshy soil.
When pressure is applied by foot to the rubber cap (pos. 2) (provided that the safety pin has been removed), the sleeve moves downward, shifts relative to the coupling and barrel, and further compresses the firing spring. When the lower part of the sleeve slots aligns with the balls (pos. 5), the latter fall into the slots and release the barrel. The barrel (together with the cartridge) moves downward under the action of the firing spring and strikes the cartridge primer against the firing pin (pos. 12). A shot is fired, and the bullet injures the foot as it exits upward through the barrel.

Preparation and emplacement
The PMP mine is emplaced in soil or in snow.
To emplace the mine, it is necessary to:
- Use the pin to make a hole in the ground for the mine.
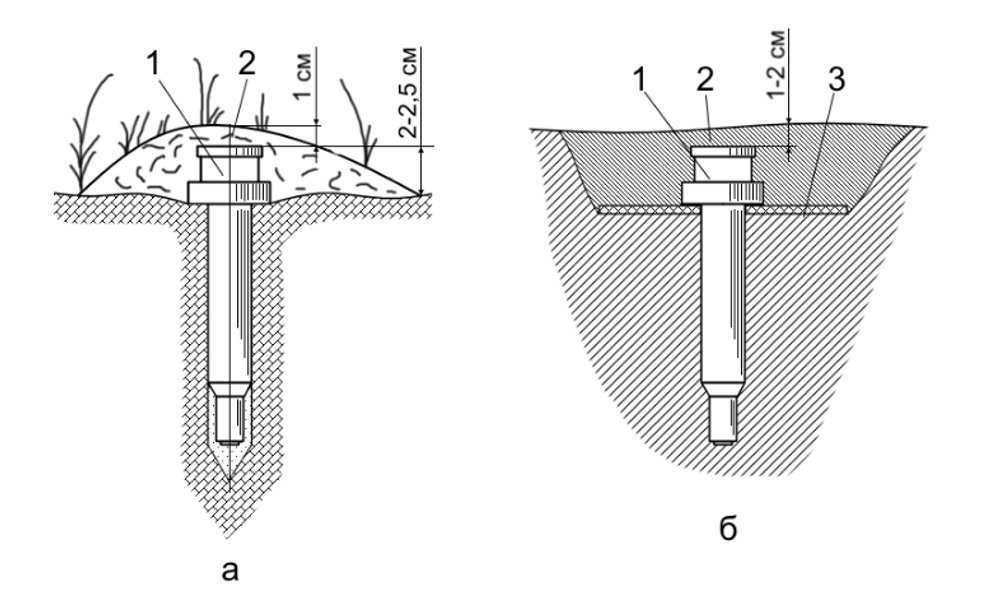
- Holding the mine by the cap nut, place it in the hole so that the nut rests on the ground; the rubber cap must be raised 2-2.5 cm above the ground surface.
- Compress the ends of the safety clip, flip the hinged ring off the cap, and remove the safety pin from the mine.
When emplacing the mine in soft marshy soil or loose snow, a plywood support washer is fitted onto the mine from below. In this case, however, the hole is made not with the pin but directly with the mine, by pressing the mine into the soil (snow). Pressure should be applied to the mine on the cap nut until the support washer bears against the soil (snow). The snow or soil under the support washer is compacted, and the mine is camouflaged with a 1-2 cm thick layer of soil (snow).

Search and neutralization
Emplaced mines are located using a mine detector.
To neutralize the mine, it is necessary to:
- Carefully remove the camouflage layer from the mine.
- Without pressing down on the cap from above, install the safety clip on the mine and secure it with the hinged ring.
- Remove the mine from the ground by grasping it by the cap nut.
It is not recommended to destroy emplaced mines by detonating placed explosive charges, by running tanks and mine rollers over them, or by rolling rollers over them, since with such methods a large percentage of mines may fail to function and retain their operability.

